Posts with topic "recipe"

Tips on using the Espro P7 coffee press

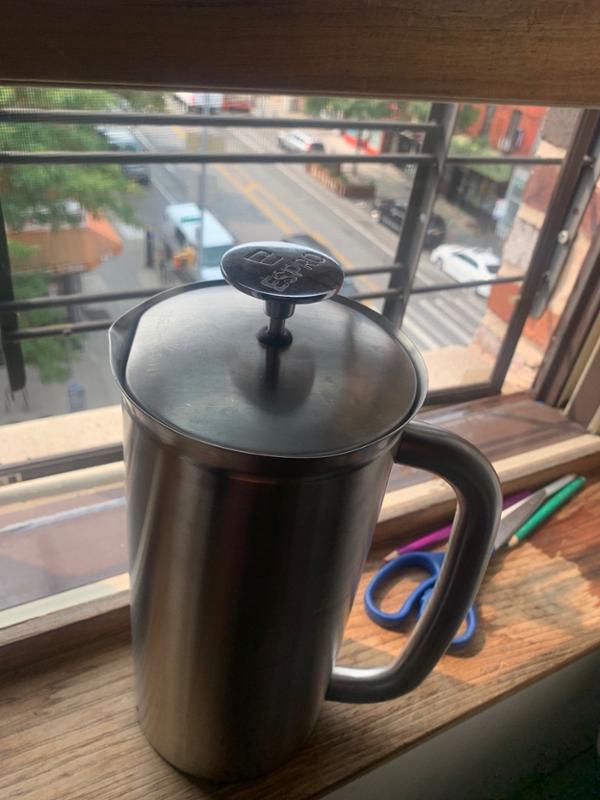
I make coffee using a stainless steel, double filter, 32 oz french press called the Espro P7. It’s a big improvement over conventional french presses — producing a cleaner cup and keeping coffee hot and insulated — but you may need to substantially alter your brewing process to obtain an equivalent cup of coffee, particularly if you are a bit finicky about coffee. Below are some tips

It brews more quickly

The P7 seems to need about 25 percent less time to extract equivalent flavors from a given amount of coffee than a conventional glass press. I hypothesize this is due to the insulated stainless steel walls keeping the water hotter during the brew process.

You may need a trick to keep the lid on during brewing

The P7 has a double filter exposed to coffee both below and on the side of the plunger. This innovative design is superior to a conventional flat, single filter at removing coffee bean particulate from your brew slurry, but occupies much more space in the press:

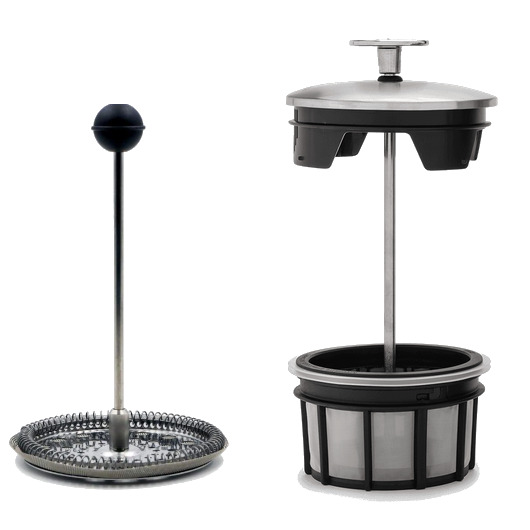
With a conventional press, the filter protrudes below the lid only perhaps 1 cm and it is no problem to keep the lid on while brewing by simply retracting the filter into an “up” position. With the P7, retracting the filter in this way creates perhaps 5cm+ protrusion, seriously limiting how full the press can be, particularly if you do not wish the grounds to be touched by the filter. In fact, I had trouble filling even to the “minimum” fill line in the beaker with the lid on and filter attached.

Nonetheless, you can brew the P7 to maximum capacity with the lid on by simply removing the plunger mechanism from the lid prior to the start of brewing. This involves unscrewing the filter from the plunger stem, perhaps five seconds of work (and something you do when cleaning anyway). Then remove the plunger stem. Then you put the lid on by itself. Then you attach the plunger and screw on the filter before brewing.

(In practice you don’t actually remove and re-attach the filter every time you brew. You just never put it on in the first place, after disassembling it to clean, then you attach it when it is time to plunge.)

There is no need to let the coffee fines “settle” after you plunge

With conventional french presses, some connoisseurs like to give 30-60 seconds after they plunge to allow fine particles that made it past the filter to settle on top of the filter as gravity pulls them down; this keeps them out of the dispensed coffee. The technique is suggested by (for example) James Hoffman and Tim Wendelboe. It is superfluous in the Espro P7 in my experience, so you can just skip that step.

(One exception: I have found more darkly roasted beans that are ground quite fine, for drip coffeemakers, can, in fact leave particulate that makes it past even the P7 filters. This is not an issue for me now since I have moved to a slightly coarser grind, see next section.)

You may want to adjust your grind settings

If you are still grinding your beans quite coarse for french press, buying a P7 offers a good excuse to experiment with finer settings, since the filters can handle finer grinds. You may find more desirable flavors are extracted from the coffee at finer grinds, and/or that brew time may be shortened.

Conversely, some people, per Wendelboe and Hoffman above, were already grinding finer for the french press than conventional wisdom has historically dictated, for example all the way down to drip coffee maker levels. They may find that the higher, more even brew temperature of the insulated P7 actually encourages them to go a couple of notches more coarse. This is because the hotter water in the P7 is extracting more flavor from the beans, and, for the same quantity of coffee and brew time as a conventional press, may produce bitter and overexacted coffee, particularly at fine grind settings.

Personally, I use a Baratza Encore burr grinder, and went from a setting of 15 (drip) with my Bodum to a setting of 21 (Chemex) with the P7. The Encore manual suggests a setting of 30-32 for french press, in keeping with traditional advice for conventional press filters.

Consider making more coffee in fewer batches

When I used a Bodum french press, I would make one cup of coffee at a time, three times per morning. This ensured that each cup was hot and properly extacted; the filter on a conventional press exposes too much of the used coffee grind to any liquid left in the beaker, in effect continuing some of the brewing process rather than properly holding the coffee.

With the P7, not only does the coffee retain more heat due to superior insulation, it is also much better sealed off from the coffee at the bottom of the pot. So now I make all three cups at once. It can take me an hour or two to dispense all the coffee and it remains very good.

A note: The P7 is actually bad at making small batches like a single cup of coffee. It retains so much brew under the filter compared to a conventional press that it is pretty inefficient to make a single cup. Espro makes smaller models if you want to make a single cup.

You will “waste” a bit more coffee

Even brewing a near full press of coffee at a time, the P7 seems a bit less efficient than my Bodum, Since the filter rides higher up the sides of the pot, per the picture above, it seems more volume is left outside the filter.

I intended to quantify this difference with a test, but unfortunately my Bodum pot shattered before I could do this. I can report that the P7 yields about 850ml of coffee when you brew 1100ml of water and 61g of coffee beans. Although this seems significantly less efficient than the Bodum, it is completely worth the slight extra waste, in my experience, to get the superior tasting coffee. The espro coffee tastes so much “cleaner” I can’t go back.

Bringing it all together: How I  brew

So given all the above this is specifically what I do to brew an excellent cup of coffee in a P7, in case anyone finds it useful. For context, my water is always 208F (via our trusty Zojirushi pot).

(Remove plunger rod and filter from lid per above if not already separate. I always leave mine separate after washing.)

Ensure the two filters, detached from the lid, are twisted and clicked together. This will make it faster to attach them later.

Grind 61g coffee at medium coarse (Chemex, 21 on Baratza Encore), put into P7 pot.

Put pot on scale, zero scale. Start count up timer.

Fill pot with 1100g (ml) of water, making sure to wet all grounds.

Put lid on pot.

At 1 minute 20 seconds, remove lid, stir grounds, re-attach lid.

At 2 minutes, remove lid, stir again, skim foam from top with a spoon (per Wendelboe in this video at 3:30).

Attach plunger to lid: Put plunger rod through lid, screw filters on to it.

At 3 minutes, place plunger + lid on top of press and press.

Dispense and enjoy coffee, returning to pot for more as needed. It stays pretty hot! In fact, I pour half cups initially in order to let the dispensed coffee cool more rapidly.

Notes

As you can see, I brew at a 1:18 coffee:water ratio, which works well for the beans I buy, which tend to be medium roast and relatively fresh.  I also prefer sweet flavors to bitter; based on what my local coffee shops serve, other folks seem to enjoy more bitter compounds and may like a richer ratio.

I also think finer grinds will probably work well with the P7, given (probably) some adjustments to the timings above, although some beans (darker roasts) seem to “shatter” more in the grinder into finer particles which can escape the P7 filter, and for those you may want to experiment with providing time for the grounds that make it past the P7 filters to settle.

My favorite fall meal (so far)

I've made the below meal twice so far this fall and it's fantastically autumnal. Also, fairly forgiving to prepare. I basically stumbled across the main course flipping through one of my go-to cookbooks after aimlessly picking up a handsome chunk of pork shoulder from the butcher. Words like "with Cider and Cream" tend to jump out at me.

  1. Shoulder of Pork with Cider and Cream
    American Cookery, James Beard.
    Online recipe (photo)

    Basting seems to be out of fashion right now, but it really works here; you'll be able to taste the apple cider in the finished roast, and the juice that doesn't stick to the meat or (blackened) to the pan will end up flavoring the cream gravy. The apple flavor compliments the nutmeg/ginger/salt rub very well.

    Notes:

    • You'll notice the recipe is technically for a "leg of pork;" Beard says later in the chapter to treat shoulder "in the same fashion as leg of pork."
    • My copy of the cookbook (1972) calls for an internal temp of 165. You'll notice the one on the website calls for an internal temp of 145. Between you and I, an internal temp of 130 when removing from the oven is probably ideal, assuming high quality meat (if the meat is cheap/factory farmed, go to 145). You'll get an extra 5-10 degrees in the center after resting.
    • The recipe calls for a ~10 pound roast, a whole shoulder or leg. I used a partial shoulder about half that weight each time. That ran about $40 at my fancy schmancy butcher, but you'll obviously get a lot of mileage out of that much meat.
    • He does a thing where you flame the roast with applejack. I forgot to do this the first time and honestly I'm not sure it made any difference at all. The second time  I forgot to remove my insta-read thermometers before flaming so now they look like this. Anyway, don't go out and buy a bottle of applejack for this recipe.
    • If you do a half recipe you'll likely end up with some blackened apple cider on the bottom of your pan (there are fewer fat drippings to absorb heat and keep the cider from steaming and reducing). Don't panic, everything is fine. The black bits will stick and stay out of the drippings you use for the gravy, and you can get them off with some Bon Ami or Comet after an overnight soak. (To minimize this, go heavier on the basting, and baste more frequently, early in the cooking, to cool off the bottom of the pan.)
    • Notice how the gravy involves pan juices, heavy cream, butter, and egg yolks? To pour on your fat laden shoulder roast? Ha ha, delicious heart disease. Anyway, you can skip the whole last part of the gravy recipe, where you stir in the yolk(s) and remaining cream. I did this on accident the first time and frankly I thought the gravy was better. It's, uh, just a little heavy with the yolks and extra cream in there.
    • If you do a half roast (5 lbs), don't forget to cut the gravy recipe in half too! 


  2. Buttermilk mashed potatoes
    The Zuni Cafe Cookbook, Judy Rodgers.
    Online recipe 

    This is one of the top two or three standout recipes in this fantastic cookbook, along with the famous Zuni Roast Chicken with Bread Salad, the sublime rosemary roast potatoes, and the wonderful polenta, hanger steak, short ribs, oxtail, and brasato recipes (among others!) You should buy this cookbook! "The Practice of Salting Early" section alone is worth the cover price. If you are a meat eater, it will change your life. Or should, at least.

    Notes:

    • The online recipe lists milk and cream/half-and-half. Do milk or cream or half-and-half, 2-3 tablespoons total.
    • Rodgers recommends that the milk/cream/half-and-half (but not the buttermilk) be hot when mixing in. I achieve this by putting it in a pan set on the stovetop (not a burner) as the roast cooks in the oven. You'll want to add an extra tablespoon or so if you do it this way in case it reduces.
    • Rodgers recommends the butter be just melted. You can microwave or do as with the milk in the bullet above.
    • Rodgers says to serve immediately "or keep warm, covered, in a double boiler, for up to 30 minutes." I think it's actually superior after 10-30 minutes in the double boiler because it will be warmer than if you serve it straightaway. Also, it greatly reduces the stress of timing the different courses since now you have a broader window for serving. If you do the double boiler, it's easiest to reserve the water you boiled the potatoes in, since it will already be hot.
    • Don't slack on the whipping, especially after the last addition (butter). Get the potatoes nice and fluffy! (The potatoes in the image above are underwhipped.) And make sure there is enough salt in there.
    • Did you buy the cookbook yet? Go buy it! The roast chicken and bread salad are just staggering.


  3. Fennel Baked in Stock and Tomato Sauce
    Adapted from How To Cook Everything, Mark Bittman.
    Online recipe

    The strong anise flavor of the fennel stands up well to all the fatty flavor in the other dishes, as does the tomato sauce. 

    The original Bittman recipe is just "baked in stock" but I was lacking in stock so filled around half the required liquid with juice from my whole canned tomatoes (think San Marzano or Muir Glen). The rest was either stock and/or water with wine and/or dry vermouth. The recipe is typical of Bittman - simple, easy, absolutely delicious (buy his cookbook too, if you haven't). 

    Notes:

    • Replace half the stock with tomato sauce, such as the juice from a can of San Marzano whole tomatoes.
    • Pretty sure I skipped the Parmesan. You're, uh, probably getting enough dairy in the other two dishes.

Eat with a hearty, casual red table wine (Côtes du Rhône, Sangiovese, Syrah, etc.) or a nice beer. Happy autumn!

The lost Thanksgiving punch of San Francisco

Quince Metheglin in glasses, pictures by Greg Lindgren

Anne and I are hosting Thanksgiving for some family and friends this year, and today I went rummaging around for punch ideas. My favorite festive tipple was, of course, the one tantalizingly out of reach: In his great 2007 column on the dearth of Thanksgiving cocktails, in which he mines history for recipe cues, Eric Felten alludes to a candidate he'd commissioned from Greg Lindgren of the San Francisco bar Rye:

He proposed poaching quince in honey, water and mulling spices, and then using the warm fruity broth to flavor a glass of brandy. Very nice indeed -- if you succeed in finding fresh quince.

Sadly, Felten never printed the recipe from Lindgren, a well regarded bar owner, drink crafter and cocktail contest ringleader. Nor could I find it anywhere online.

Greg Lindgren at Slow Food Nation via Rebecca Chapa

One whois search later, I fired off an email to Lindgren asking if he might share the recipe he'd sent to Felten. I didn't expect he'd still have the thing handy, three years on, but in less than an hour he sent back full instructions, complete with pictures.

Even better, he's given me permission to reprint the recipe here.

A bit of backstory: The drink is dubbed a "Metheglin" in reference to a spiced drink of fermented honey popular in England in the early 17th Century, when the Pilgrims headed out to start Plymouth Colony (and then promptly ordered two hogsheads of Metheglin from back home). Felten asked Lindgren and other bartenders for a drink inspired by the brew.

Although Felten worried his readers wouldn't be able to source quince, I discovered a a nice trove at the first place I chcked, Monterey Market in Berkeley. They're on your immediate left past the front door, inexplicably lodged between the lemons and grapefruit (related to apples and pears, quince is not citrus). Pic below. Admittedly, things won't be this easy for all shoppers.

Without further ado:

Quince Metheglin

by Greg Lindgren

Quince at Monterey Market in Berkeley by Ryan Tate

Ingredients

  • 8 quinces (skins peeled)
  • 16 oz wild honey
  • 1 tsp cloves
  • 1 whole nutmeg seed (crushed or chopped, not grated)
  • 1 tsp chamomile
  • 4 cinnamon Sticks
  • 4 qt water
  • 750 ml brandy (Germain-Robin Craft Method)

In a 4" deep baking pan (something sturdy):

Place peeled quinces in pan and drizzle the honey over all of the quince fruit.

Fill pan with water until the quinces are just submerged.

Use a mesh tea ball, or tea bag to contain crushed nutmeg, chamomile, and cloves. Drop this into the water along with 4 cinnamon sticks.

Cover the pan tightly with aluminum foil and put the pan in a preheated oven set at 425 degrees.

Let the quinces poach until they are soft all the way through. The poaching liquid will turn a sunset pink color from the quince flesh. Remove pan and let cool until it can be handled safely. Using tongs, remove all quince fruit, cinnamon sticks, and tea ball. Skim the poaching liquid if necessary. Reduce liquid on stove top. If neccessary add honey to sweeten. Combine quince poaching liquid with brandy to taste and keep warm on the stove top, or in a punch bowl that can hold warm liquid. 

You can discard the poached quinces, or use them to make a quince paste.

What I like about this beverage besides the great flavor of quince, honey, brandy and spice is the vibrant color. My photos here don't do it justice. (They appear amber/rust color).

In natural light the Quince Metheglin is slightly pinkish. 

This was very easy to make, the hardest part was being patient long enough to let the quince fully poach. Readers would have different sizes of pans, so my instructions were to cook by color and tenderness rather than time and exact measure. I checked my quinces at one hour in the oven and they were still a little white in the center while the liquid was just turning from clear to gold. An hour and a half later the quinces and the poaching liquid were the right color, and all the flavor was there.

I wrote to mix with brandy to taste. The base is quite sweet at 1 part brandy to 4 parts base ratio. I liked mine 1 part brandy to 2 parts base. Water could also be added to make it less sweet if necessary without adding too much spirit for some palates.

[Recipe text and photos (top) by Greg Lindgren and reprinted with permission. Lindgren photo via Rebecca Chapa's Slow Food Nation album. Consider a visit to Lindgren's bars Rye (a delightful mixologist hub), Rosewood and 15 Romolo.] 

A cóctel for the Cup

Tequila con Sangrita
So for my birthday my wife gave me, among other delightful things, Kingsley Amis' Everyday Drinking,  a fitting addition to the other titles on my cocktail bookshelf, Absinthe's Art of the Bar and Eric Felten's How's Your Drink? (HI ERIC!!).

Anyway, tonight I was plowing through the second chapter, "Actual Drinks," and, amid many weird cocktails built around fortified wines from the Iberian peninsula, there was an intriguing entry distilled from Amis' time down South America way. The drink, "La Tequila con Sangrita," is sort of like a Mexican Bloody Mary, but with the booze served separate from the tomato stuff.

With some tweaks -- Amis' version serves three and is built, inexplicably, using Tobasco sauce and Cayenne pepper -- the two-fisted drink was something Anne and I agreed, emphatically, we can get behind. What's more, I think it would be ideal for the Mexico-Argentina World Cup match next Sunday, 11:30 am/2:30 pm depending what part of the U.S. you're in. Here's my adaptation of Amis' recipe:

  • 1.5oz tequila, neat, unchilled, in its own glass. A good blanco works fine, provided it's 100 percent blue agave. I don't suppose a more expensive reposado or anejo tequila would muss things up, but the pricey stuff is certainly not necessary. Just avoid Cuervo and other mixto tequilas.
  • 1.5 oz tomato juice. I used a fresh roma tomato and pressed it through a mesh strainer; juicing one with clean hands would be fine too, provided you're OK with pulp and seeds, and I don't imagine canned juice would be so terrible. Tomatoes can well!
  • Generous 1/2 oz fresh lime juice. Or, if you can't be bothered to measure, half a large lime or a full smaller one
  • 1/2 teaspoon (or more, say four dashes) Tapatio, Cholula, or other Mexican hot sauce. Or Tabasco if you're hard up - if it's good enough for Amis, you'll probably be fine.
  • Two pinches salt.

Amis on how to serve:

The tomato concoction and the tequila do not meet until they arrive to start a joint operation in your stomach. Each partaker gets a small glass of neat, unchilled tequila and a twin glass of the stirred, also unchilled red stuff, and sips in alteration...

You will find it a splendid pick-me-up, and throw-me-down, and jump-on-me.

Sounds about right. Sangrita means "little blood," which is what I hope our southern neighbors inflict on those Falkland-grubbing Argentine bastardos. (I guess. I've actually not been following the Cup. But... Salud!)